Your First API Program (v4)
Harvard
Library's LibraryCloud
David Weinberger
version: Dublin Core , no PHP: Jan. 15, 2015
(cc) Creative Commons CC-BY: May be used in whole or in part without asking permission, provided its authorship is acknowledged and a link back to this page [link] is provided.
The finished files for this project are available at:
http://hyperorg.com/misc/myFirstApiScript/Harvard-HarvardLibCloud/myFirstApiScript.zip
|
Contents
0. Introduction 0.1
Who this is for
1. The
HTML0.2 What we're going to do 0.3 How this will work 0.4 Wait, what are those things? 2. The JavaScript 2.1
AJAX and jQuery
3.
Displaying the results :Part 13.1
The data: JSON
4. Putting
it all together3.2 Displaying the results: Part 2 3.3 CSS 5. Debugging 6. Making it better 6.1
Prettying it up
7. Beyond
LibraryCloud6.2. Extract more information 6.3 When you have questions 6.4 Share your code |
Section 0: Introduction
0.1. Who this is for
If you were attracted to this post by the phrase "API" rather than being scared off by it, this may be for you.
I'm going to take you through the basics of writing a program that accesses information on a site owned by an organization that has decided to make that information available through an API .
The data will come from Harvard Library, through the API provided by LibraryCloud. (We will use the version of LibraryCloud developed for Harvard Library. There is also a version of this tutorial using the Harvard Library Innovation Lab's earlier version of LibraryCloud.)
The user interface will be the world's ugliest Web page.
To follow this tutorial, it's preferable that you:
- Have written a program before, so that you understand things like what a variable is
- Have a basic understanding of HTML
To do the examples, you should have installed on your computer:
- A text editor such as TextWrangler on the Mac or NotePad++ on a PC, although any plain old text editor will do. (If you like 'em, support 'em.)
- A Web server. On the Mac or PC, I'd suggest you install the free version of MAMP, which isn't hard but isn't easy. Alternatively, you could post the HTML files you'll be writing onto a hosted site, but I find running the web server locally (that is, on my own laptop) to be more convenient.
- The free jQuery library.
I'll give you some help installing MAMP and downloading jQuery. All in good time.
0.2. What we're going to do
We're going to write a very simple Web page that lets a user type in a search term that will fetch information about books in Harvard Library's collection of thirteen million items that match that term. We'll be doing a basic "keyword" search that will look for the search term in many different parts of each item's record. So, a search for "London" will turn up London Travel Guide, Wild Thing by Jack London, and any Sherlock Holmes book that has "London" in its description.
0.3 How this will work
The following will become clearer as we work through each step, but here's the road map:
-
We'll write a Web page in HTML that presents the user with a place to type in a search term.
-
A "search" button will invoke a program written in JavaScript.
-
The JavaScript will interact with the the LibraryCloud API.
-
The LibraryCloud API will interpret the program's request, and will come back with information about the items in the Harvard Library collection.
-
The JavaScript will interpret that information and insert it into the HTML as a list of titles.
0.4 Wait, what are those things???
HTML is the language that Web pages are written in.
JavaScript is a programming language that knows how to work with HTML. The browser on the user's computer that is displaying the HTML runs the JavaScript.
An API is an Application Programming Interface. It's a software layer that lets software applications request information from a site.
LibraryCloud is a server that makes information about Harvard Library's collection of items accessible through an API. There's more about LibraryCloud here. [Full documentation is under development.]
Section 1: The HTML
HTML consists of content and markup. The content is what the user sees. The markup are instructions to the browser about how to format that content and how to make the content interactive.
The most basic Web page starts off with a header that the user doesn't see. The body has the content the user sees and markup that's hidden from the user.
Here's the page we'll construct.
| 1 |
<html> |
| 2 |
<head> |
| 3 |
<title>My first API script</title> |
| 4 |
<link rel="stylesheet" type="text/css" href="style.css"> |
| 5 |
<script type="text/javascript" src="jquery-1.11.1.min.js"></script> |
| 6 |
<script type="text/javascript" src="myFirstApiScript.js"></script> |
| 7 |
</head> |
| 8 |
<body> |
| 9 |
<H1>Searching Harvard Library</h1> |
| 10 |
<p>This page lets you search Harvard Library's collection.</p> |
| 11 |
<textarea id="searchbox"></textarea> |
| 12 |
<input type="button" value="Search!" onclick="doSearch()"> |
| 13 |
<div id="resultsdiv"></div> |
| 14 |
</body> |
| 15 |
</html> |
Open up a new file with your text editor and paste this in. Save it in a new folder (maybe call it "MyFirstApiScript" and maybe call this file "MyFirstApiScript.html") somewhere on your computer. [Note: click on the "Toggle line numbers" button so that you can select and copy just the text. Or consider downloading the completed files from here.]
Let's go through it line by line.
| 1 |
<html> |
Elements that are within angle brackets (< >) are markup, or "tags." The first piece of markup tells the browser that this is an HTML document. Note that the very last line (#12) repeats the "html" tag but puts a forward slash before it ("</html>"); this tells the browser that we are now at the end of the HTML document. Most HTML tags follow this convention of repeating the tag preceded by a "/" to flag that the tag is no longer in effect.
| 2 |
<head> |
This tag tells the browser that everything up through the </head> tag on line 4 is to be considered an invisible instruction.
| 3 |
<title>My first API script</title> |
This tells the browser what name to display in its title bar or tab.
| 4 |
<link rel="stylesheet" type="text/css" href="style.css"> |
| 5 |
<script
type="text/javascript"
src="jquery-1.11.1.min.js"></script> |
| 6 |
<script
type="text/javascript"
src="myFirstApiScript.js"></script> |
These three lines tell the browser to include three files. Two of them contain programming code, and the third -- "style.css" -- has some formatting instructions. We'll talk about all three in good time, but pay them no mind for now.
| 4 |
</head> |
We're now at the end of the header information.
| 5 |
<body> |
This tells the browser that the visible part of the page begins here.
| 6 |
<H1>Searching Harvard Library</h1> |
<H1> is a standard HTML tag that tells the browser to format the content as if it were a first level (i.e., major) heading.
| 7 |
<p>This page lets you search Harvard Library's collection.</p> |
Likewise for <p>, a tag used for "normal" paragraph text.
| 8 |
<textarea id="searchbox"></textarea> |
A textarea is a built-in HTML object that provides a space that the user can type into (like this: . In this case, we've added a little more invisible information to the textarea: we've given it an ID of "searchbox." We could have used any combination of letters and numbers (although there are some rules forbidding weirdnesses). The JavaScript we'll write will use that ID to get information about the textarea.
| 9 |
<input type="button" value="Search!" onclick="doSearch()"> |
The "input" tag tells the browser that we're going to provide some way for the user to interact with the page. We tell it the "type" is "button" which will cause the browser to create a press-able button on the page, with the word "Search!" written in it, like this: . (Feel free to create your own label instead of "Search!". Go nuts.)
The "onclick='doSearch()'" tells the browser than when the user presses the button ("onclick"), the browser should look for some JavaScript code called "doSearch." We'll write that code soon.
| 10 |
<div id="resultsdiv"></div> |
A "div" is another standard tag. It creates a rectangular area on a web page into which goes content that should stay together on the page. In this case, the JavaScript we'll write will use this "div" (with an id of "resultsdiv") as a place to list the results of its search of the Harvard Library.
| 11 |
</body> |
| 12 |
</html> |
We're at the end of the page's body. In fact, we're at the end of the page itself.
1.1. Try out your Web page (and configuring MAMP or XAMPP)
We want to load this new HTML page into a browser to see how it looks. That's a little trickier than any of us would like. For example, simply opening up the Mac Finder or Windows Explorer and double clicking on the file will launch it into your default browser, but the browser won't treat it like a Web page. For that to happen, you have to have a Web server present it to the browser.
To see if you need to install a Web server, type "localhost" into your browser's address bar. If it tells you that there is no file found, you need to install a web server. Try MAMP for your Mac (download ) or XAMPP for your Windows PC (download) . Follow their installation instructions and they will install the Apache web server, as well as some other pieces we're not going to need. On the Mac, MAMP installs itself into your Applications folder, creating a folder called "MAMP."(It also creates a "MAMP PRO" folder. Ignore that folder, but do not delete it.) Within MAMP is another folder called "htdocs." That's where you should save all the files we're going to create. So, in "htdocs" create a folder called "myFirstApiScript" (or whatever) and save the HTML document you just created into that folder under the name "myFirstApiScript.html"
We'll use a Mac for our example. So, let's configure MAMP. Start it up. You should see something like this on the Mac and something similar on the PC:
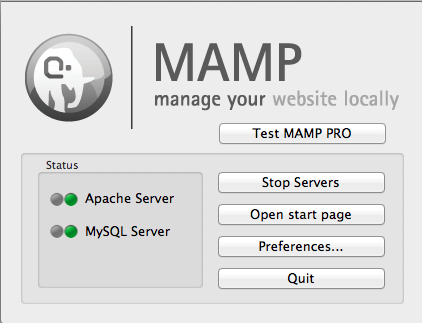
Both the Apache Server and MySQL Server LEDs should be green. (We don't need MySQL for this project but it won't harm anything. It's a database manager.) Click on "Open Start Page" in the MAMP dialogue box and you should get a "Welcome to MAMP page" in your browser. Excellent!
Go back to the MAMP dialogue box. Click on "Preferences..." and choose the "Ports" tab on the page that opens up. You should see something like this:
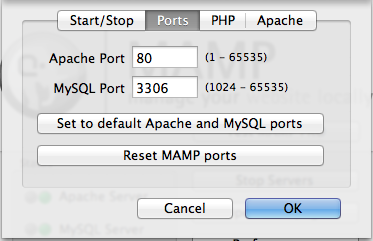
Click on "Set to default Apache and MySQL ports."
Save your changes, but keep MAMP open.
Now give it a try by loading your new web page into your browser. But remember to do this by using the address that will tell your new Web server to treat your page not like a plain old text file but as a web page full of web instructions and wonders. That might be:
http://localhost/myFirstApiScript/myFirstApiScript.html
Your browser will now talk to the Apache web server (the "localhost" does that), and that Web server will deliver the Web page to your browser, so that you see something very much like this in your browser:

If not, check the page in your text editor. Browsers are finicky about some tags that don't have matching closing tags .(A closing tag is a tag preceded by a forward slash.) They're also finicky about unmatched quotation marks within tags.
Just remember: if you're not seeing roughly what the screen capture above shows, it's your fault.
Section 2: The JavaScript
Start a new file in your text editor and call it "myFirstApiScript.js". The ".js" signifies that this will be a JavaScript file.
JavaScript is a programming language designed to work with HTML documents. It is one of the less scary programming languages.
As with most modern programming languages, it not only knows how to do things (add numbers, remove letters from a string of characters, etc.), it lets the programmer create new functionality— new things you've taught your JavaScript program how to do. In our case, we want to create a function called "doSearch" (because that's what we happened to name it in the HTML document) that will search Harvard's collection of library items (books and more) for anything that matches the word that the user has typed into the textarea. This will happen when the user presses the button we created in the web page.
So, into our blank JavaScript document paste the following:
| 1 |
function doSearch(){ |
| 2 |
// Do the search |
|
|
|
| 3 |
var searchbx = document.getElementById("searchbox"); // get the searchbox |
| 4 |
var searchterm = searchbx.value; // get the search term |
|
|
|
| 5 |
// if it's blank, give up |
| 6 |
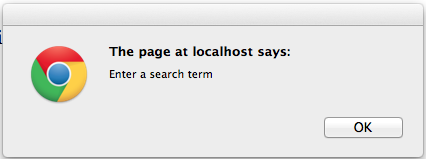
if (searchterm == ""){ |
| 7 |
alert("Enter a search term"); // put up an explanation for the user |
| 8 |
return; // jump out of this funciton |
| 9 |
} |
|
|
|
| 10 |
// Do the API call |
| 11 |
$.ajax({ |
| 12 |
url: 'api.lib.harvard.edu/v2/items.dc.json', |
| 13 |
type: 'GET', |
| 14 |
data: {q : searchterm}, |
| 15 |
success: function(r){ |
| 16 |
displayResults(r); |
| 17 |
}, |
| 18 |
error: function(e){ |
| 19 |
alert("Something went wrong: " + e); |
| 20 |
} |
| 21 |
}); |
| 22 |
} |
There's a lot going on here, so let's once again take a look at this line by line.
| 1 |
function doSearch(){ |
We create a new function by declaring it with the word "function," then the name we want to give it ("doSearch") followed by a pair of parentheses. (Later we'll see what those parentheses are for.) Notice also the opening curly brace ( { ) and the matching one all the way at the end. The function itself goes between those curly braces.
| 2 |
// Do the search |
Double forward slashes are comments. Anything after them on a line is ignored.
| 3 |
var searchbx = document.getElementById("searchbox"); // get the searchbox |
First, note that JavaScripts expects a semicolon at the end of an instruction.
"var" indicates that the next word is a variable. If you've done any programming, you know that a variable is a label the programmer makes up to hold some value. In this case, "searchbx" will stand for the textarea in the Web page —not the content of the textarea, but everything about the textarea. But to understand the rest of this line, you need to understand the concept of the DOM (document object model):
From the user's point of view, a Web page looks like text and graphics laid out on a page. From the browser's point of view, the Web page consists of a set of objects that are nested within various containers. The biggest container is the document itself. In our Web page, in the document there is an H1, p, textarea, button, and an empty div, in that order. A div is itself a container, and it can contain other containers. So, to the browser, the page looks like sets of nested containers that contain objects — or like a branching tree, as the professionals think of it.
So, the line
document.getElementById("searchbox");
tells the top-level container — the document — to do something it knows how to do: find an element within it that has the ID of "searchbox." (Note the capitalization of "getElementById," especially that last "d". It matters.) The JavaScript then sets the value of the variable "searchbx" to the textarea that has the ID of "searchbox."
| 4 |
var searchterm = searchbx.value; // get the search term |
Now we have to ask the textarea to tell us what its contents are. We do that by telling "searchbx" to do something it knows how to do: give us its value. The variable "searchterm" now contains whatever text the user typed into the text area.
You may have noticed my use of phrases such as "tell us what its contents are" or "ask it to do something it knows how to do." That's because from the browser's point of view, the things on the page are objects. An object is something that comes with certain properties and capabilities. For example, the "<p>" tag creates an object that has properties such as font-size and margins. It has capabilities ("methods," to be technical) such as letting a user select some text within it. Likewise, the "<textarea>" tag creates an object that knows how to display the text typed in by the user. A textarea doesn't know what to do if you try to paste an image into it. Likewise, a "<p>" doesn't have a way to accept and display keystrokes from a user, which is why you usually can't edit the text on Web pages. (Note to the picky: Some of this paragraph is slightly inaccurate for the sake of clarity.)
| 6 |
if (searchterm == ""){ |
But suppose the user forgot to type anything into the textarea? Let's check. The parentheses after the "if" contain a condition that can be true or false. If the conditions evaluate to true then the code within the curly braces (lines #7-8) are executed. Otherwise, the browser just skips right over them.
In this case, the test is whether the value of the textarea (i.e., what the user typed in, as captured in the variable "searchterm") has any content. So, if the variable "searchterm" equates to an empty string of text (""), then the lines between the curly braces will be run.
A couple of notes: As you probably know, a "string" is programming talk for what we would normally call text. Second, notice the double equal signs. This is crucial. If you forget and only put in one equal sign (and everyone makes that mistake more than once), JavaScript won't test whether the variable "searchterm" has any characters. Rather it will set the variable "searchterm" to a string with no characters. Remember: The "==" means "test this." The "=" means "set this."
| 7 |
alert("Enter a search term"); // put up an explanation for the user |
| 8 |
return; // jump out of this function |
So, if "searchterm" is empty, then line #7 will pop up a notice that tells the user to enter a search term
Line #8 will jump out of the entire doSearch function. Nothing else will happen.
What happens next needs its own section.
2.1. AJAX & jQuery
| 10 |
//Do the API call |
| 11 |
$.ajax({ |
At line #11, a couple of new concepts collide. Let's take a look.
2.1.1. AJAX
Before AJAX was invented, whenever you interacted with a Web page in a way that required it to go get some more information from its home base — maybe you clicked on one of the movies listed on your local theater's page — the browser would have to reload the entire page. And you would wait. After AJAX, a Web page can ask for some additional information and just plop it into the existing page. That makes much more sense.
But the steps JavaScript requires to do an AJAX call are ridiculously complex. Which brings us to our second topic...
2.1.2. jQuery
JavaScript is great, but there are some functions that are a bit unwieldy. And some are seriously unwieldy. Like using AJAX.
So John Resig, an extremely talented and very generous JavaScript coder wrote a bunch of functions in JavaScript that make JavaScript easier to use. Those functions are called jQuery.
Over the years, jQuery has come to include an incredible library of functions that you are free to use as if they were built into JavaScript. For example, you could write a function in JavaScript that will cause a new element on a Web page to fade in slowly while increasing in size, but it'd be a lot of work. Or, you could invoke that functionality with a single line of jQuery.
As a reminder, here's the part of our code that does the AJAX work:
| 10 |
// Do the API call |
| 11 |
$.ajax({ |
| 12 |
url: 'api.lib.harvard.edu/v2/items.dc.json', |
| 13 |
type: 'GET', |
| 14 |
data: {q : searchterm}, |
| 15 |
success: function(r){ |
| 16 |
displayResults(r); |
| 17 |
}, |
| 18 |
error: function(e){ |
| 19 |
alert("Something went wrong: " + e); |
| 20 |
} |
| 21 |
}); |
To tell JavaScript that you're using a function from jQuery, you preface it with a dollar sign. In this particular case, we're using jQuery's function for doing an AJAX call. (Note that that lines #13-21 generally end in commas, not semicolons. This is because. Just go along with it.)
| 12 |
url: ' 'api.lib.harvard.edu/v2/items.dc.json',', |
Line #12 gives the basic Web address of LibraryCloud. Remember, one of the glories of a Web-based API like LibraryCloud's is that it uses the mechanisms of the Web so that programs can ask it for data as easily as a human asks a normal Web site for a Web page.
This Web address contains some extra information after the first slash. The "v2" directs the API request to version 2 of the API. The "items" tells the API that the request will be for information about library items. (LibraryCloud has another API, for example, that has information about the ways in which items have been clustered into collections.) The "dc" tells the API that we want information to be returned to us using the conventions of Dublin Core (which we'll explain later). The ".json" tells the API to structure the information using the conventions of JSON, which we'll also explain later. (If you don't specify ".json," you'll get it in XML form which is a little harder to work with).
| 13 |
type: 'GET', |
Line #13 tells AJAX that we only want to retrieve some information, not update any info on the LibraryCloud server. LibraryCloud wouldn't let us do any updating anyway.
| 14 |
data: {q : searchterm}, |
Because LibraryCloud uses a Web-based API,we have to cram all the information about what we want from it into a single URL. If our search term is "evolution," then the URL that we want in this case is:
http://api.lib.harvard.edu/v2/items.dc.json?q=evolution
The "?" marks the end of the Web address and the beginning of the list of parameters of our search. The "q=" is LibraryCloud's keyword telling it that we want to do a search for whatever text comes after it. If we wanted to search for items that have the word "evolution" in their subject fields, the phrase after the "?" would be "subject=evolution."
If we wanted to add a second search parameter, telling it to search for items with "evolution" in their subject fields but that also have the word "birds" somewhere in their record, we'd use a "&" to separate them, and the URL would look like this:
http://api.lib.harvard.edu/v2/items.dc.json?q=birds&subject=evolution
If you paste this into your browser's address field, you will (should!) get results back from the API
The way jQuery's AJAX works, you give the keyword "data" a list of the API keywords and values you want it to automatically add to the end of the basic API Web address. In our example, we only have one API keyword — "q" — but if we wanted to add another, the line would look like this:
data: {q : searchterm, subject : "evolution"},
(Remember that "searchterm" is a variable we've defined in this function. In a more realistic example, we would use a variable to hold the subject search term, instead of hardcoding in a search for "evolution.)
| 15 |
success: function(r){ |
| 16 |
displayResults(r); |
| 17 |
}, |
If our API call works ("success:"), JavaScript should jump to a new function ("displayResults") which we have not yet written, and should pass the results of the API call to that new function. Those results should be a list of items that meet the terms of our search; they're in the variable we have chosen to call "r."
| 18 |
error: function(e){ |
| 19 |
alert("Something went wrong: " + e); |
| 20 |
} |
If, on the other hand, something's gone wrong with our attempt to get data out of the Harvard Library, then we'll pop up a dialogue box that tells the user that something has gone wrong, including a message ("e") about what the error was. "Alert" is JavaScript that creates a popup box.
The ")};" on line #21 ends the multi-line call to the jQuery AJAX function.
Section 3. Displaying the results
At this point we've asked the LibraryCloud API for works that have the user's desired search term somewhere in their record. The API has complied. We have results! Yay!
So, let's go back to our JavaScript (myFirstApiScript.js) and write the displayResults function that's going to show those results on our Web page, making our users oh so happy. But it's going to take some conceptual work to get there.
The first thing we're going to do is to declare displayResults as a function, which we do as follows:
function displayResults(res){

}
The "res" in the parentheses is a variable that contains the value passed to it by the "success" function in the AJAX we just looked at. That's what the parentheses in a function declaration are for: to enable data to be passed into the function.
3.1. The data: JSON
But what data?
Because it's conceivable that there could be many works with our search term — Harvard has over a million books that have "history" as their subject — the API quite reasonably only returns the first ten. You can always go back for more.
Here's a slightly simplified version of the information about a single book returned by the API for the search term "peanuts":
Pagination: {
        numFound: 182012,
        limit: 10,
        start: 0,
        item: [
            {
                title: [
                    "Creamy & crunchy: an informal history of peanut butter, the all-American food",
                    "Creamy and crunchy"
                ],
                contributor: "Krampner, Jon , 1952-",
                type: [
                    "Text",
                    "bibliography",
                    "History."
                ],
                publisher: "Columbia University Press",
                language: "eng",
                format: [
                    "print",
                    "xv, 298 p. : ill. ; 24 cm."
                ],
                description: [
                    "Creamy and Crunchy feature stories of Jif, Skippy, Peter Pan;"
                ],
                subject: [
                    "Peanut butter--United States--History",
                    "TX803.P35 K73 2013",
                    "641.3/56596"
                ],
                coverage: "United States",
                identifier: [
                    "9780231162326 (cloth : alk. paper)",
                    "0231162324 (cloth : alk. paper)",
                    "isbn: 9780231530934 (e-book)",
                    "isbn: 0231530935 (e-book)",
                    "lccn: 2012008529",
                    "013634709"
                ]
            }
        ]
    }
Remember, that's not JavaScript. It's data. (Well, it's actually data expressed as a JavaScript object. Never mind.) In this example, we're showing only one work that matches the search term we queried it about, even though the "numFound" tells us that there were actually 182,012, and it has returned information about the ten of them. It also tells us that these are the first ten ("start: 0").
Notice the "{" on the first line? That's matched with a "}" all the way at the end.In between, there are ten "items," although the example above only shows the first. Each has information about author, title, etc. That information is expressed in key:value pairs. For example, "title" is a key and "Creamy and Crunchy" is the value. Expressing data in key:value pairs makes it easy for Javascript to find the information if we tell it the key we're interested in, as we'll see.
Take a look at the "type" key and notice that the value is between brackets: [ ] That means that the values inside constitute an array. An array is essentially a list of items. For the keyword "type," there are three values, separated by commas.
You have probably already noticed that the value for the keyword "title" is also an array even though it has only one element. That's permitted, and knowing that the "title" keyword will always return an array will make it easier to make sense of that information when we work with it in JavaScript. You should also know that items in an array can be arrays themselves; there is no end to the depth of the nesting of arrays that can occur.
So, that's what the API sent back to our JavaScript .
3.2. Displaying the results: Part 2
We got as far as creating an empty function for importing the JSON retrieved by the AJAX call from the API.
function displayResults(res){

}
Now let's fill it in so it actually does something.
Here's the complete display function:
| 1 |
function displayResults(results){ |
| 2 |
// display the results of the query |
|
|
|
| 3 |
// get the div where the results will be shown |
| 4 |
var showdiv = document.getElementById("resultsdiv"); |
| 5 |
// empty that div of its current contents |
| 6 |
showdiv.innerHTML = ""; |
| 7 |
var titleInfo, title, authorInfo,author; // create a variable or two |
| 8 |
// cycle through each of the elements of the results array |
| 9 |
for (i=0; i< results.item.length; i++){ |
| 10 |
// get the author |
| 11 |
authorInfo = results.item[i].contributor; |
| 12 |
// if there was no author key, provide some helpful content |
| 13 |
if (authorInfo == undefined){ |
| 14 |
authorInfo = "[No author listed]"; |
| 15 |
} |
| 16 |
// is it an array? |
| 17 |
if ($.isArray(authorInfo)){ |
| 18 |
author = authorInfo.join("; "); |
| 19 |
} |
| 20 |
else { // if it's not an Array |
| 21 |
author = authorInfo; |
| 22 |
} |
| 23 |
// get the title |
| 24 |
titleInfo = results.item[i].title; |
| 25 |
// if there was no author key, provide some helpful content |
| 26 |
if (titleInfo == undefined){ |
| 27 |
titleInfo = "[No title listed]"; |
| 28 |
} |
| 29 |
// is it an array? |
| 30 |
if ($.isArray(titleInfo)){ |
| 31 |
title = titleInfo.join(" - "); |
| 32 |
} |
| 33 |
else { // if it's not an Array |
| 34 |
title = titleInfo; |
| 35 |
} |
|
|
|
| 36 |
// create a new div for the title and add it to the page |
| 37 |
var currentcontent = showdiv.innerHTML; |
| 38 |
showdiv.innerHTML = currentcontent + "<div class='oneresult'><span class='titleclass'>" + title + "</span>, by <span class='authorclass'>" + author + "</span></div>"; |
|
|
|
| 39 |
} |
| 40 |
} |
We've got a lot of work ahead of us. Shall we dive in?
After some comments, we get the first line of code:
| 4 |
var showdiv = document.getElementById("resultsdiv"); |
Remember in the HTML page we created a "div" (an empty block on the page) with an id of "resultsdiv"? Line #4 finds that div, using "getElementByID" discussed above, and assigns it to the variable "showdiv". (Can you find the error in in the prior sentence? Capital!)
| 6 |
div.innerHTML = ""; |
Every time someone clicks on the "Search" button, we want to delete any old results. This line tells "showdiv" to replace any of its HTML content with the content between the quotation marks, which is nothing.
| 7 |
var titleinfo, title, author; // create a variable or two |
We create variables called "titleinfo", "title," and "author." As of now, they don't have any values associated with them.
| 9 |
for (i=0; i< results.items.length; i++){ |
Prepare for trickiness. (Also note that a professional coder would do this in a more compressed and efficient way. Our way works fine, though, and is easier to explain.) We want to look at every result in the JSON. These are in an array with the key "docs." So, this line sets up a loop that works like this:
- Set "i" equal to zero.
- Check to see if i is less than the number of elements in the docs array.
- If it is less, then execute the lines within the curly brackets and increase the value of "i" by one ("i++").
- Repeat until the value of "i" is no longer lower than the number of elements in the array.
Now let's step inside the curly brackets to see the code that is executed for every result our query found.
| 11 |
authorInfo = results.item[i].contributor; |
Once you understand the dots, this line will make sense. So, we have stuffed all of the results of our query — the entire JSON — into a variable called "results." Those results contain an array called "items". Each item in the "items" array is itself an array with a key called "contributor." The dots tell JavaScript to look inside the "results" variable. So,
results.items[i].contributor
can be read as: Take the variable "results," look at the "items" array inside of it, look at the particular element of the "items" array that we're currently cycling through ("i"), and grab the value of the "contributor" key . (It might be easier to think about it if you mentally replace the dots with >'s or right-facing arrows or something.)
Let's go through this one more time, because it is confusing. We got a set of ten results to our query. All the information about them is now in a variable called "results." That variable has an array of ten items. Each item is the record of one book (or DVD, etc.). Each record has information about the author, recorded in the "contributor" key. It also has information under keys such as "title" and "subject."
| 13 |
if (authorInfo == undefined){ |
| 14 |
authorInfo = "[No author listed]"; |
| 15 |
} |
Now we want to handle the case where there is no author listed in the record, as sometimes happens. If in line #11 we try set the variable "authorInfo" to the value of the "contributor" key, but there is no "contributor" key, JavaScript will consider it to have the special value of "undefined." So, in line #13 we check to see if that's the case. If so, we supply it a more friendly value.
| 17 |
if ($.isArray(authorInfo)){ |
| 18 |
author = authorInfo.join("; "); |
| 19 |
} |
Now we have to do a different sort of check, for sometimes the value of "title" is an array. Sometimes it's just the title expressed in a string of characters, and sometimes it's an array of such strings. Line #17 uses jQuery to check.
By the way, you may notice that we don't use the double equal signs here. But we could. Line #17 could be:
if ($.isArray(authorInfo) == true){
But it doesn't have to be because when that line is run, the computer sees that "$.isArray(authorInfo)" evaluates to true, which works out to being the same as testing whether it's true. I would have done the longer form with the double equal signs, but professional developers often use the shorter method, so you should know about it.
In line #18 we handle the case that the "contributor" key contains an array. If so, we're going to take all the elements of the array and join them into one single string, each element separated by a dash. That's what "join(" - ")" does. So, if the two elements of the array were "Great Expectations" and "Education in America," the "join" command will turn them into "Great Expecations - Education in America."
| 20 |
else { // if it's not an Array |
| 21 |
author = authorInfo; |
| 22 |
} |
But suppose "authorInfo" isn't an array? The "else" will come into effect, and set "author" to the value of "authorInfo".
| 23 |
// get the title |
| 24 |
titleInfo = results.item[i].title; |
But why stop with the author? Let's get the title, too. So, we do the exactly same thing as we did to get the author, except looking for the "title" key.
In fact, because this procedure is precisely the same as what we just did, reread the the paragraphs above and use your imagination.
| 37 |
var currentcontent = showdiv.innerHTML; |
| 38 |
showdiv.innerHTML = currentcontent + "<div class='oneresult'><span class='titleclass'>" + title + "</span>, by <span class='authorclass'>" + author + "</span></div>"; |
Each time through the loop that we initiated in line#9, we're going to add a visible line to the Web page showing the title of a book. So, in line #37 we capture the current contents of the "showdiv" document element — that is, we'll be capturing the content our loop has put into it so far.
Line #38 is a long one. It's going to add the HTML we need in order to display the author and title we just grabbed from the results. We add the HTML by setting "showdiv's" innerHTML to the current content (expressed by the variable "currentcontent") and then adding the new title and author. We're going to make a new div to hold the author and title. Within that div we'll have two spans, one for the title and one for the author.
Here's what the completed HTML for one result — for one div — might look like:
<div class='oneresult'><span class='titleclass'>War of the Worlds</span><span class='authorclass'>H.G. Wells</span></div>
We've assigned a class to the div and its two spans so that a CSS file can do some styling.
So, let's talk briefly about CSS...
3.3. Displaying the results: CSS
CSS — Cascading Style Sheets — let you define the look of the elements on the page. For example, suppose you have a Web page that consists of questions and answers. You might want the questions to be in bold and blue, while the answers should be in gray, and should be indented. You'd put those style definitions in a separate file, and then would put a link to that file in the header of your HTML page.
And that's exactly what we've done. If you go all the way back to the "<head>" of HTML page we're building, you'll see this:
| 4 |
<link rel="stylesheet" type="text/css" href="style.css"> |
The "href" tells the browser the name of the CSS file. In this case we've named it "style.css." So create a blank document and save it under that name in the same folder where the HTML file is. Here's what you'll see in it.
| 1 |
.authorclass{ |
| 2 |
color: green; |
| 3 |
} |
| 4 |
.oneresult{ |
| 5 |
background-color: #BCFFDC; |
| 6 |
width: 500px; |
| 7 |
margin-top: 10px; |
| 8 |
font-family: "Helvetica Neue", Helvetica, Arial, Verdana, Sans Serif; |
| 9 |
} |
| 10 |
.titleclass{ |
| 11 |
color: blue; |
| 12 |
} |
This CSS file assigns style properties to three classes. The first is "authorclass". To tell CSS that "authorclass" is a class, we preface it with a period: .authorclass. Then everything between the curly braces is a list of style properties we want to affect. In the case of "authorclass," all we're going to do is turn it green.
Next is the "oneresult" class that we've assigned to the div that contains the author and title spans. We've given it a background color (expressed in hexadecimal — find a color picker that will give you that way of expressing color), given it a width of 500 pixels, have given it 10 pixels of space to separate it from the result above it, and gave it a list of fonts to use — a list in case someone's computer doesn't have our first choice of fonts.
Because the author and title spans are contained by the div that has been set to "oneclass," the author and title spans will inherit the relevant styles we've set for that container. So the author and title spans will have the same font family and background color.
Without any CSS, this is what two results would look like:

With the CSS we created this is what they look like:

You think it's not pretty? Good! Fiddle with it until you like it.
Here's one CSS tutorial.
Have fun.
Section 4. Putting it all together
You've written all the code you need, but the button on your HTML page won't work until you've stitched it together.
All your files should be in one folder, which you might have named "MyFirstApiScript." In there should be:
- MyFirstApiScript.html - your web page
- MyFirstApiScript.js - your JavaScript
- a jQuery file.
So, about that jQuery file: Go to the download page (jquery.com/download). Or, better, just get the 1.11.02 version by clicking here: 1.11.02. By the time you read this, there will likely be newer versions, but for our minimal purposes, this version will be fine. Now, when you click on the 1.11.02 link, it may load a bewildering page of text into your browser. Good. All you have to do is go to your browser menu and click "Save." Save it to the "MyFirstApiScript" folder under the name "jquery-1.11.1.min.js". One way or another, you want a file with that name in your folder.
Remember back int the HTML header there were two lines we skipped? Here they are:
<script type="text/javascript" src="jquery-1.11.1.min.js"></script>
<script type="text/javascript" src="myFirstApiScript.js"></script>
The first line tells your browser to load the code in the jQuery file. The second tells it to load the code in your JavaScript file.
Section 5: Debugging
There's virtually no chance that you did everything right the first time. Nothing personal, but you're a human, right?
Unfortunately, debugging is beyond the scope of this tutorial. Best of luck to you!
Section 6: Making it better
7.1. Prettying it up
CSS is a deep art, but you can get started if you know that it can adjust the formatting of (1) built-in HTML elements such as H1 and P, (2) the formatting of any element that has an ID, and (3) the formatting of elements that share a class. You indicate a built-in element with its name, an element with an ID by putting a "#" in front of the ID, and a class by putting a "." in front of the class:
| Type of element | CSS label example |
| Built-in HTML element | H1 |
| Element with a unique ID | #resultsdiv |
| Any element with a particular class | .oneresult |
Here's a more varied example of some CSS:
          H1 {
    font-family: "Helvetica Neue," Helvetica, Arial, Verdana;
    color: "#0D5BFF";
}
P {
    font-family: "Helvetica Neue," Helvetica, Arial, Verdana;
}
#resultsdiv{
    background-color: #F6F1FF;
    border-width: 1px;
    border-style: solid;
    border-color: #5EA6FF;
}
.oneresult{
    font-family: "Helvetica Neue," Helvetica, Arial, Verdana;
    font-size: 12px;
    color: #1525FF;
    background-color: #C0D6FF;
    margin-left: 50px;
}
(a) H1 and P are built-in elements. (b) "#resultsdiv" is a unique element with that ID. (c) ".oneresult" is a class that can be applied to any number of elements.
There's much much much more you can do with CSS. You'll find plenty of help on the Web.
6.2. Extract and display more information
We could extact much more information from the JSON. And then we could do something about it. Let's put a red border around any book that's not in English.
| 40 |
showdiv.innerHTML = currentcontent + "<div class='oneresult'><span class='titleclass'>" + title + "</span>, by <span class='authorclass'>" + author + "</span></div>"; |
That's where we build a div for each result. If you are feeling adventurous you could add some lines immediately after it:
| 1 |
// get the language |
| 2 |
var lang = results.item[i].language; |
| 3 |
// assign a new class if the language isn't English |
| 4 |
if ((lang != undefined) && (lang != "eng")) { |
| 5 |
// get the last div we added to resultsdiv |
| 6 |
var noteng = $("#resultsdiv div").last(); |
| 7 |
// add the class "notenglish" to it |
| 8 |
$(noteng).addClass("notenglish"); |
| 9 |
} |
Let's walk through them:
| 2 |
var lang = results.item[i].language; |
Line #2 should look familiar: it gets the value of the key "language" for each of the records returned by the query.
| 4 |
if ((lang != undefined) && (lang != "eng")) { |
Another familiar line: we check to see if there was a "language" key and, if there was, was its value "eng," which is the code word for "English." So, if the "language" key isn't empty and isn't "eng," we move on to the next step.
| 6 |
var noteng = $("#resultsdiv div").last(); |
So, here's our problem. We have a div with an id of "resultsdiv" into which we've been stuffing new divs, each representing a result that's been returned. The first time through, the first result's div has been stuffed inside of "resultsdiv." The second time, the second result div is stuffed in, etc. If one of the results is for an item that's not in English, we want to add a new class to it; that class will add a red border around it. But first we have to be able to point at that particular result's div.
jQuery makes this easy. In line #6, we tell jQuery to find the last div in the container div (which has the id of "resultsdiv"). The first parenthetical in jQuery is the "selector": it tells jQuery what element to do something to. jQuery's ability to select elements is quite powerful i.e., complex. For now, let's just accept that "('#resultsdiv div)'" tells jQuery to select all of the divs in the "resultsdiv" div. (Also perhaps something about a woodchuck.)
The second parenthetical tells jQuery what to do with the elements it's identified. In this case, we want to select the last of the divs, which unsurprisingly is what ".last()" does. And then we set the variable "noteng" to that last div.
| 8 |
$(noteng).addClass("notenglish"); |
Now for one last jQuery trick. This time the selector will be the div we just located in line #6. We want to add to it a new class: "notenglish." Yes, elements can have more than one class.
Now, this will do absolutely nothing because we haven't defined "notenglish" in our CSS file. So, we want to open up that file and add a new style definition:
| 1 |
.notenglish{ |
| 2 |
border-width: 5px; |
| 3 |
border-style: solid; |
| 4 |
border-color: red; |
| 5 |
} |
Save your CSS file and re-load the HTML page. Now when a result has a "language" key but its value isn't "eng," a red border 5 pixels thick will be drawn around the result's box.
6.3. When you have questions
When you can't figure out how to do something, and especially when you're sure you do know how to do it but it's not working, StackOverflow.com is your friend. Millions of stuck developers find succor there. You can ask a question and very likely an anonymous set of developers will pitch in to answer it.
But, before you post a question, search the site. Since the site has answered over three million questions, it's extremely likely — just about definite — that your question has already been answered.
And keep in mind that while Stackoverflow is an incredibly useful site, it isn't designed to answer questions peculiar to any one API.
6.4. Share your code
We have no choice but to learn from one another. The code you've created can teach someone else to do what you've done (or possibly how not to do it :) The code you create can be re-used by someone with the same or related need.
So share your code!
There are two steps:
1. Post your code somewhere where people can find it. (Eventually you'll want to know about GitHub.)
2. Indicate in your project that you're providing your code under one of the available open licenses.
There are multiple open licenses you can use. The MIT license and Gnu Public License (GPL) are two of the most commonly used. Here's some text you can paste somewhere in your project (preferably where users won't see it):
-
License Dual licensed under the MIT license (below) and GPL license.
GPL License http://www.gnu.org/licenses/gpl-3.0.html
MIT License
Permission is hereby granted, free of charge, to any person obtaining a copy of this software and associated documentation files (the "Software"), to deal in the Software without restriction, including without limitation the rights to use, copy, modify, merge, publish, distribute, sublicense, and/or sell copies of the Software, and to permit persons to whom the Software is furnished to do so, subject to the following conditions:
This permission notice shall be included in all copies or substantial portions of the Software.
THE SOFTWARE IS PROVIDED "AS IS", WITHOUT WARRANTY OF ANY KIND, EXPRESS OR IMPLIED, INCLUDING BUT NOT LIMITED TO THE WARRANTIES OF MERCHANTABILITY, FITNESS FOR A PARTICULAR PURPOSE AND NONINFRINGEMENT. IN NO EVENT SHALL THE AUTHORS OR COPYRIGHT HOLDERS BE LIABLE FOR ANY CLAIM, DAMAGES OR OTHER LIABILITY, WHETHER IN AN ACTION OF CONTRACT, TORT OR OTHERWISE, ARISING FROM, OUT OF OR IN CONNECTION WITH THE SOFTWARE OR THE USE OR OTHER DEALINGS IN THE SOFTWARE.
Somewhere visible, you should proudly let your users know that your work is Open Source.
Thanks for sharing!
7. Beyond LibraryCloud
The basic techniques I've explained here will work with lots of other APIs, although each has its own way of specifying what results you want. To find out, you have to visit their page of documentation.
Some require that you get a special "key" from them that identifies who is doing the asking. Quite often those keys are free, and their documentation will explain both how to get one and how to embed it in the query your script sends to the API. For example, check out the excellent documentation for the API of the Digital Public Library of America.
Good luck riding the open range!